Running my hybrid cloud
Table of Contents
Introduction #
I have been running my own private cloud for almost 10 years now, going from a single node Openstack deployment to a multi-node Kubernetes cluster that runs nodes in different geographic areas. I have been using it for a variety of things, from hosting my own websites to running my own email server, because i like to test different technologies as real world as possible and i like to have full control over my data.
For this hybrid deployment i created a separate 1 node Ubuntu 22.04.1 LTS microk8s cluster running on an AMD Ryzen 7 5800X 8-Core Processor with 128GB DDR4, 2 x 4TB WDC WD40EFAX-68J HDD ( spinning disks for S3 storage ) and 2 x WDC WDS200T2B0A SSD. The SSD’s are used one for the OS and the default hostpath storage class and the other one is used for Rancher’s hostpath provisioner ( local-path-provisioner ).
I tried the minimal configuration using the onboard LAN but it was performing so poorly that i bought a 4 x 1Gb PCI-E network card and i used it for the cluster’s only physical network connection. The rest of the networks are software defined with WireGuard. There’s also an AMD GPU Radeon RX 580X w ~8GB of VRAM that i intended to use for GPU accelerated workloads.
Unfortunately giving a chance to AMD for a full CPU + GPU platform was a bad ideea, as drivers and support for the GPU are still not there and therefore i’s impossible to run any GPU accelerated k8s jobs. This is still under research and i might sell the AMD GPU and get an Nvidia GPU for AI and machine learning workloads.
Initialy i was planing to write a very short article with minimal block design and concept, but when examining my thousands of lines in the notes i realised that i have to write a lot more to make it understandable and useful for others. Besides that, some of the information in this article was really challenging to find and corelate, so it might be helpfull for a lot of other people that are playing around with similar technologies.
I’m going to try as much as possible to organise into chapters, but bare in mind that this is a work in progress and i will be updating it as i go along. It’s quite a lot to write, and time is a scarce resource
“Ok, but where’s the hybrid part ?” you might ask.
Well, as any home customer i’m behind a crazy ISP NAT / CGNAT and wtahever any ISP is doing these days and a port map is simply out of the question. So here enters an Amazon EC2 instance ( or any other cloud, as all we need is a droplet with a public IP ) In my case i’ve chosen an amazon t4g.nano instance ( 2 vCPU, 0.5GB RAM, 1GB EBS ) and i’ve installed a WireGuard VPN server on it and Haproxy to “translate” ports from the public IP to the internal WireGuard cluster network ip’s.
🚦 My advice is to look into reserved instances and plan for 1 year ahead, at least. This will keep your EC2 cost to under ~100USD / year.
⚠️ As a little disclaimer, be mindfull when exposing private servers and services to the internet, and make sure that you don’t keep sensitive information in non-encrypted storage or files. Use GitHub secrets and other secure methods as much as possible, use long username / password combinations and don’t use the same password for multiple services.
- This website is hosted using this hybrid cloud solution and is one of the services that is exposed to the public internet.
The cluster #
I wanted to set some objectives right from the start, so this setup will be “production like” from all points of view except redundancy ( as i have a single physical node ), but the one node can be replicated as it is to a multiple node deployment.
All services are secured and publcly exposed services are secured with Let’s Encrypt SSL certificates and firewalled and all management access is done over an encrypted virtual private network defined with WireGuard.
Objectives:
Secure and private whith the ability to expose services to the public internet.
Software-defined everything as much as possible. All the nodes are assumed to have only 1 network interface and 1 public IP
Highly available and fault tolerant. The cluster should be able to recover from a node failure without any manual intervention. ( This is not the case for the single node deployment, but with minimal changes it can be replicated to a multi-node deployment ).
Sandbox for multiple technologies to have a versatile testing ground for new ideas.
Easy to maintain and upgrade. The cluster should be easy to maintain and upgrade with minimal downtime.
Initial setup #
🚦 Networks :
192.168.0.0/16 - VPC
192.168.168.0/24 - LAN ( the local home network )
10.0.0.0/24 - WireGuard VPN internal network
EC2 instance #
I’m going to start here with the EC2 instance, as it’s the only node that is not part of the cluster, but it’s the one that will be used to access the cluster’s public services. You’re free to use any other cloud provider as i will not be using any of Amazon’s specific services.
Create a VPC, a security group and an EC2 instance. A basic terraform configuration would look like this :
providers.tf
terraform {
    required_providers {
        aws         = {
            source  = "hashicorp/aws"
            version = "~> 4.5.0"
        }
    }
}

provider "aws" {
    region = "us-east-1"
}
Change the region to your preferred one.
vpc.tf
data "aws_availability_zones" "available" {}

module "vpc" {
    source  = "terraform-aws-modules/vpc/aws"
    version = "3.2.0"

    name                 = "personal"
    cidr                 = "192.168.0.0/16"
    azs                  = data.aws_availability_zones.available.names
    private_subnets      = ["192.168.10.0/24", "192.168.20.0/24", "192.168.30.0/24"]
    public_subnets       = ["192.168.40.0/24", "192.168.50.0/24", "192.168.60.0/24"]
    enable_nat_gateway   = false
    enable_dns_hostnames = true

    tags                                    = {
        Env                                 = "personal"
    }
}

output "vpc_id" {
    description = "The ID of the VPC"
    value       = module.vpc.vpc_id
}

output "private_subnets" {
    description = "Private Subnets"
    value       = module.vpc.private_subnets
}

output "public_subnets" {
    description = "Public Subnets"
    value       = module.vpc.public_subnets
}
keypair.tf
resource "aws_key_pair" "personal" {
    key_name   = "personal"
    public_key = "yourkeyhere"
}
ec2.tf
resource "aws_instance" "private" {
    ami                         = "ami-0b49a4a6e8e22fa16" # <= ubuntu 20.04 AMI
    instance_type               = "t4g.nano"
    associate_public_ip_address = true
    key_name                    = "personal"
    subnet_id                   = module.vpc.public_subnets[1]
    vpc_security_group_ids      = [aws_security_group.personal.id]

    root_block_device {
        volume_size = 30
    }

    tags     = {
        Name = "personal"
        Env  = "personal"
    }
}

resource "aws_eip" "personal" {
    instance = aws_instance.private.id
    vpc      = true
}

# Outputs

output "public_ip" {
    description = "the instance public ip"
    value       = aws_eip.personal.public_ip
}
security.tf
resource "aws_security_group" "personal" {
    name_prefix = "personal"
    vpc_id = module.vpc.vpc_id

    egress {
        from_port        = 0
        to_port          = 0
        protocol         = "-1"
        cidr_blocks      = ["0.0.0.0/0"]
        ipv6_cidr_blocks = ["::/0"]
    }

    ingress {
        from_port   = 8
        to_port     = 0
        protocol    = "icmp"
        description = "Allow ping"
        cidr_blocks = [
            "0.0.0.0/0"
        ]
    }

    ingress {
        from_port = 80
        to_port   = 80
        protocol  = "tcp"

        cidr_blocks = [
        "0.0.0.0/0"
        ]
        description = "HTTP"
    }

    ingress {
        from_port = 443
        to_port   = 443
        protocol  = "tcp"

        cidr_blocks = [
        "0.0.0.0/0",
        ]
        description = "HTTPS"
    }

    ingress {
        from_port = 9000
        to_port   = 9000
        protocol  = "tcp"

        cidr_blocks = [
        "0.0.0.0/0",
        ]
        description = "S3"
    }

    ingress {
        from_port = 9001
        to_port   = 9001
        protocol  = "tcp"

        cidr_blocks = [
        "0.0.0.0/0",
        ]
        description = "S3-Admin"
    }

    ingress {
        from_port = 20000
        to_port   = 20000
        protocol  = "udp"

        cidr_blocks     = [
        "0.0.0.0/0",
        ]
        description = "Allow UDP WireGuard"
    }

    ingress {
        from_port = 22
        to_port   = 22
        protocol  = "tcp"

        cidr_blocks     = [
        "0.0.0.0/0",
        ]
        description = "Allow SSH"
    }

    ingress {
        from_port = 0
        to_port   = 65535
        protocol  = "tcp"
        self      = true
        description = "Allow self"
    }

    tags = {
        Name = "personal"
        Env  = "personal"
    }
}
This should produce an EC2 instance and a public IP that you can use to access the cluster’s public services.
WireGuard and Haproxy #
For the next step, SSH into the instance and install Haproxy and WireGuard.
sudo apt update
sudo apt install wireguard
sudo apt install haproxy
wg genkey | sudo tee /etc/wireguard/private.key
sudo chmod go= /etc/wireguard/private.key
sudo wg pubkey < /etc/wireguard/private.key | sudo tee /etc/wireguard/public.key
- The sudo chmod go=… command removes any permissions on the file for users and groups other than the root user to ensure that only it can access the private key.
Choose an IPV4 address for the WireGuard network. I’m going to use 10.0.0.0/24 Create a wireguard configuration file for the endpoint.
sudo nano /etc/wireguard/wg0.conf
[Interface]
Address = 10.0.0.1/32
SaveConfig = true
ListenPort = 20000
PrivateKey = <private_key>

[Peer]
PublicKey = <peer_public_key>
AllowedIPs = 10.0.0.2/32


[Peer]
PublicKey = <peer_public_key>
AllowedIPs = 10.0.0.3/32, 10.0.0.99/32, 10.0.0.100/32 # k8s host wg0 IP, Metallb IP's
- In case you want a more detailed explanation of the WireGuard configuration in general, check out this article on DigitalOcean
Start the WireGuard service and enable it to start on boot.
systemctl start wg-quick@wg0.service
systemctl enable wg-quick@wg0.service
Now we need to configure Haproxy to expose our public services to the internet. I chose to use Haproxy as a “naked” TCP proxy because i’m using Traefik later on and it was far easier to setup than any other solution. ( If you know a better way, please let me know )
    global
        nbproc 2
        cpu-map 1 0
        cpu-map 2 1
        maxconn 150000
        log /dev/log    local0
        log /dev/log    local1 notice
        chroot /var/lib/haproxy
        stats socket /run/haproxy/admin.sock mode 660 level admin expose-fd listeners
        stats timeout 30s
        user haproxy
        group haproxy
        daemon

        # Default SSL material locations
        ca-base /etc/ssl/certs
        crt-base /etc/ssl/private

        # See: https://ssl-config.mozilla.org/#server=haproxy&server-version=2.0.3&config=intermediate
        ssl-default-bind-ciphers ECDHE-ECDSA-AES128-GCM-SHA256:ECDHE-RSA-AES128-GCM-SHA256:ECDHE-ECDSA-AES256-GCM-SHA384:ECDHE-RSA-AES256-GCM-SHA384:ECDHE-ECDSA-CHACHA20-POLY1305:ECDHE-RSA-CHACHA20-POLY1305:DHE-RSA-AES128-GCM-SHA256:DHE-RSA-AES256-GCM-SHA384
        ssl-default-bind-ciphersuites TLS_AES_128_GCM_SHA256:TLS_AES_256_GCM_SHA384:TLS_CHACHA20_POLY1305_SHA256
        ssl-default-bind-options ssl-min-ver TLSv1.2 no-tls-tickets

    defaults
        log global
        mode    http
        option  httplog
        option  dontlognull
        timeout connect 5000
        timeout client  50000
        timeout server  50000
        errorfile 400 /etc/haproxy/errors/400.http
        errorfile 403 /etc/haproxy/errors/403.http
        errorfile 408 /etc/haproxy/errors/408.http
        errorfile 500 /etc/haproxy/errors/500.http
        errorfile 502 /etc/haproxy/errors/502.http
        errorfile 503 /etc/haproxy/errors/503.http
        errorfile 504 /etc/haproxy/errors/504.http

    frontend stats
        bind *:8080
        stats enable
        stats uri /stats
        stats refresh 10s
        # stats admin
        stats auth admin:adminpassword # change this, obviosuly
                                       # or disable it :)

    userlist basic-auth-list
        group is-regular-user

    listen l1
        bind 0.0.0.0:443
        mode tcp
        timeout connect  4000
        timeout client   180000
        timeout server   180000
        server k8s 10.0.0.99:443 # This is a k8s IP that exist only
                                 # in the virtual WireGuard network

    listen l2
        bind 0.0.0.0:80
        mode tcp
        timeout connect  4000
        timeout client   180000
        timeout server   180000
        server k8s 10.0.0.99:80 # This is a k8s IP that exist only
                                # in the virtual WireGuard network

    listen l4
        bind 0.0.0.0:9000
        mode tcp
        timeout connect  4000
        timeout client   180000
        timeout server   180000
        server minio 10.0.0.3:9000 # This is the private wg0 IP of the k8s host
                                        # as minio runs directly on the bare-metal
                                        # machine for performance reasons
    listen l5
        bind 0.0.0.0:9001
        mode tcp
        timeout connect  4000
        timeout client   180000
        timeout server   180000
        server minio 10.0.0.3:9001 # This is the private wg0 IP of the k8s host
                                        # as minio runs directly on the bare-metal
                                        # machine for performance reasons
I’m running Haproxy with ’nbproc’ as i want to take advantage of the multi-core CPU of the instance. I’m also using the ‘cpu-map’ option to bind the processes to the cores.
Block structure #
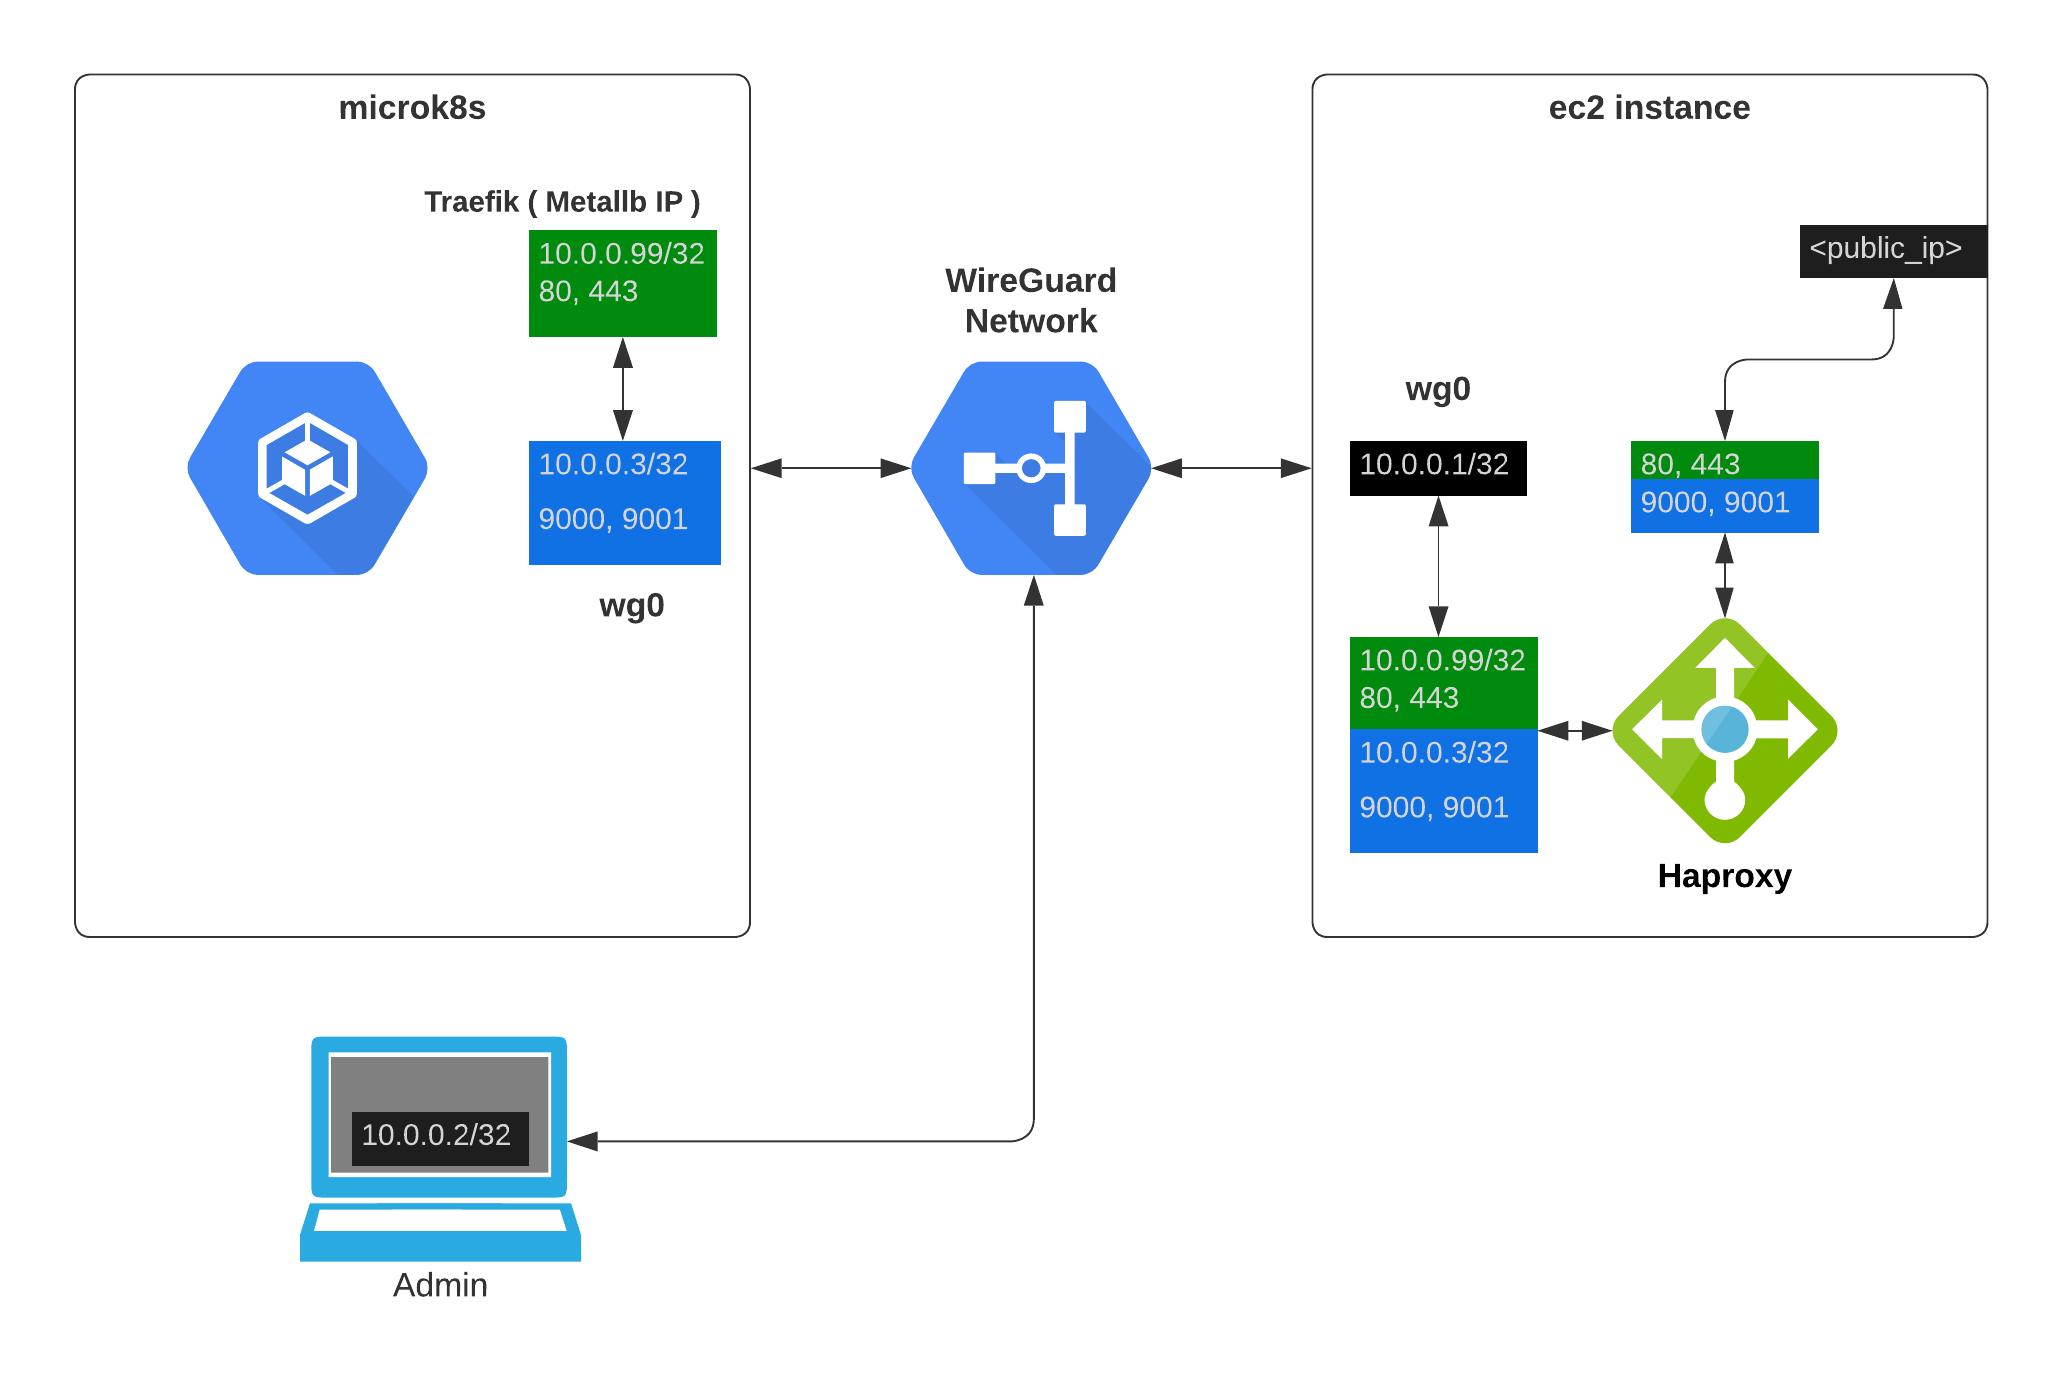
- WireGuard creates a virtual network and allows traffic between all nodes in the network, so for Haproxy the IP 10.0.0.99 is just a machine in the local network.
As a result, i can deploy services using a Traefik instance ( that has the IP 10.0.0.99/32 ) and expose them to the internet using Haproxy, and i can deploy other services using other load balancers / Traefik instances and expose them only to the private network configured with WireGuard without exposing them publicaly but compatible with a public DNS service ( i’m using Cloudflare ).
A service like ‘https://s3.serverworks.es:9000’ can have a public IP and be accessible from the internet, and a service like ‘https://devenv.serverworks.es’ can be accessible only from the private network with a public DNS record pointing to the private IP inside the WireGuard network ( 10.0.0.100/32 or others ). This also means that valid SSL certificates can be used for both internal and public services generated by the same mechanism using cert-manager. The setup does not update the IP addreses automaticaly but i might add this feature later on.
In general i would recomend against using a wildcard matching rule in the DNS ( *.domain.tld ) but if you have a single Traefik load balancer for a project you can eliminate the need of subdomain DNS updates if you set ‘*.domain.tld IN A <your_public_ip>’ and use the ‘Host’ header to route the traffic to the correct service.
Only from within the WireGuard VPN network i can administer and access k8s and k8s internal services, making this setup very secure.
Microk8s #
I won’t cover installing a fresh ubuntu( Ubuntu 22.04.1 LTS ) partitioning and mounting the disks as i have a particular setup and i don’t want to cover all the possible scenarios.
My setup is like this ( all disks are formated as ext4 and have 1 partition, except sda that holds the OS ):
SSD Setup
- sda - OS
- sdb - /mnt/ssd_data1 ( rancher hostpath provisioner )
HDD Setup
- sdc - /mnt/hdd_data1 ( MinIO disk1 )
- sdd - /mnt/hdd_data2 ( MinIO disk2 )
Swap
- sde - /mnt/swap ( 128GB swap ) ( i had an old unused SSD and i decided to use it as swap )
You can’t use less than 2 disks / mounts / folders for MinIO( more on this in the MinIO chapter ).
💡 I’m using the following mount parameters for extra performance:
noatime,nodiratime,data=writeback,barrier=0 0 0
Install microk8s and enable the following addons:
sudo snap install microk8s --classic --channel=1.25/stable
- ( i’m using 1.25 but you can use the latest stable version )
Set up your Docker Registry login for microk8s ( this is optional but i recomend it because Docker limits the number of pulls for unauthenticated users ):
- This is option one, that basicaly uses your docker login for all image pulls that are otherwise unspecified
Containerd login to docker.io:
nano /var/snap/microk8s/current/args/containerd-template.toml
  # Login to my docker ID ( you@domain.tld )
  [plugins."io.containerd.grpc.v1.cri".registry.configs]
    [plugins."io.containerd.grpc.v1.cri".registry.configs."docker.io".auth]
      auth = "your_docker_aurh_key" # obtained from your config.json file
- This is option two, that allows you to specify a registry for each image pull
1 : Login to Docker CLI 2 : Generate the Kubernetes secret from Docker authentication token 3 : Update the Kubernetes deployment yaml to reference the secret
First, using the Docker CLI, run the “docker login” command and provide the desired credentials. This creates a file at ~/.docker/config.json which contains the associated authentication token. ( I rand this on my MacBook and used the contents of the JSON )
Next, copy the config.json file to host where kubectl is installed. Run the following command to import the config.json to be stored as a secret in Kubernetes. Customise the “config.json” path to point to the local copy.
kubectl create secret generic registry_login \
--from-file=.dockerconfigjson=~/config.json \
--type=kubernetes.io/dockerconfigjson
Or inline like this:
kubectl create secret docker-registry registry_login \
                      --docker-server=<your-registry-server> \
                      --docker-username=<your-name> \
                      --docker-password=<your-pword> \
                      --docker-email=<your-email>
The cluster is now configured to authenticate remotely, the last step is to update the deployment configuration to reference the secret. In the yaml definition of the deployment, add the reference to ‘imagePullSecrets’ as follows, it should be at the same level as the ‘containers’ definition.
    spec:
      imagePullSecrets:
        - name: registry_login
      containers:
Enable the following addons:
sudo microk8s enable community

sudo microk8s enable dns rbac metrics-server \
     metallb:10.0.0.99-10.0.0.100
MinIO #
wget https://dl.min.io/server/minio/release/linux-amd64/archive/minio_20230210184839.0.0_amd64.deb -O minio.deb
sudo dpkg -i minio.deb
After installing MinIO, create or edit /etc/default/minio:
# MINIO_ROOT_USER and MINIO_ROOT_PASSWORD sets the root account for the MinIO server.
# This user has unrestricted permissions to perform S3 and administrative API operations on any resource in the deployment.
# Omit to use the default values 'minioadmin:minioadmin'.
# MinIO recommends setting non-default values as a best practice, regardless of environment.

MINIO_ROOT_USER=<your_minio_root_user>
MINIO_ROOT_PASSWORD=<your_minio_root_password>

# MINIO_VOLUMES sets the storage volumes or paths to use for the MinIO server.
# The specified path uses MinIO expansion notation to denote a sequential series of drives between 1 and 4, inclusive.
# All drives or paths included in the expanded drive list must exist *and* be empty or freshly formatted for MinIO to start successfully.

MINIO_VOLUMES="/mnt/hdd_data{1...2}"

# MINIO_SERVER_URL sets the hostname of the local machine for use with the MinIO Server.
# MinIO assumes your network control plane can correctly resolve this hostname to the local machine.

# Uncomment the following line and replace the value with the correct hostname for the local machine.

MINIO_SERVER_URL="<your_minio_server_url>:port" # i.e. https://s3.serverworks.es:9000

MINIO_BROWSER_REDIRECT_URL="<your_minio_browser_redirect_url>:port" # i.e. https://s3.serverworks.es:9001

# --console-address = admin web page / --address = S3 endpoint

MINIO_OPTS="--console-address :9001 --address :9000" # change the ports for your setup
💡 You can use the following command to generate a random password:
openssl rand -base64 32
This will gennerate a 32 character password with a mix of upper and lower case letters, numbers and special characters.
Minio is installed directly on the k8s cluster host. It is not installed via helm. It runs as a unprivileged user “minio-user” and has SSL certs in /home/minio-user/.minio/certs, and the certificated will need to be created and managed with Let’s Encrypt. ( cert-manager is only for k8s services )
Create a file named “cloudflare.ini” with the following content:
- If you are using CloudFlare, you can find the instructions here, if not use your DNS provider’s instructions.
# Cloudflare API token used by Certbot
dns_cloudflare_api_token = <your_cloudflare_api_token>
Generate your SSL cert with certbot:
certbot certonly --dns-cloudflare --dns-cloudflare-credentials cloudflare.ini --dns-cloudflare-propagation-seconds 60 -d <your_s3_domain>
Copy the generated certs to the minio user’s home directory, and ajust the file names and permissions:
cp /etc/letsencrypt/live/<your_s3_domain>/privkey.pem /home/minio-user/.minio/certs/private.key
cp /etc/letsencrypt/live/<your_s3_domain>/fullchain.pem /home/minio-user/.minio/certs/public.crt
I wrote a bash script to automate the process of copying the certs to the minio user’s home directory. MinIO wants the certs in that specific path to work with SSL properly and i haven’t been able to change MinIO’s config to just load the certs from ‘/etc/letsencrypt/live/<your_s3_domain>/’, if you do leave a comment.
#!/bin/bash

# Define the source and destination directories
src_dir="/etc/letsencrypt/live/<your_s3_domain>"
dest_dir="/home/minio-user/.minio/certs/"

# Copy fullchain.pem to public.crt
cp -f "$src_dir/fullchain.pem" "$dest_dir/public.crt"

# Copy privkey.pem to private.key
cp -f "$src_dir/privkey.pem" "$dest_dir/private.key"

# Change ownership of the destination directory to minio-user:minio-user
chown -R minio-user:minio-user "$dest_dir"

# Restart the minio service to apply the changes
systemctl restart minio.service
After you run “systemctl start minio” you can check the details like this:
journalctl -f -u minio.service
Should look similar to this:

Now you can access your MinIO server via the browser at <https://<your_minio_server_url>:9001>
You can play around and create buckets, upload files, etc. The monioring part will be covered later on, when deploying the Prometheus and Grafana stack to microk8s Monitoring).
💡 Read the MinIO documentation for the MinIO console.
MinIO Client #
I suggest you install the MinIO client on your local machine, it will make your life easier when testing updating and managing your S3 setup.
This guide asumes you have downloaded and installed MinIO client on your local machine.
Edit your minio config file ( located at ~/.mc/config.json ) and add your setup, change the values to match your setup and the name of the alias to whatever you want ( mine is local ).
{
 "version": "10",
 "aliases": {
  "local": {
   "url": "https://<your_minio_server_url>:9000",
   "accessKey": "<s3_username>",
   "secretKey": "<s3_password>",
   "api": "S3v4",
   "path": "auto"
  }
 }
}
Test your setup by listing the buckets:
mc ls local/ # should list the buckets if you created any
K8S Services #
I like to start by setting up monitoring and i’m using Prometheus and Grafana for that, with prometheus-stack being what i’ll using for all my setups.
I’m using Traefik to expose and secure Grafana with SSL, and Traefik uses a separate certificate management than the rest of the services so i will be covering the setup of Traefik and Let’s Encrypt in the first section, even before the Prometheus stack is configured. For now we have the internal monitoring of the k8s cluster and we can see that with a client like Infra. ( i’m using the free version ).
- I have no affiliation with Infra, i just like the app, and i might pay the ~100$ for the pro version in the future.
Traefik #
- Needs Metallb enabled.
helm repo add traefik https://helm.traefik.io/traefik
helm repo update
kubectl create namespace traefik
I could probably write an entire article on Traefik configuration ( I might ) but for now i’m sticking to the basics plus Cloudflare and Let’s Encrypt, which are mandatory for public facing services.
A basic values.yaml would look like this:
---
experimental:
  # kubernetesGateway: # Enable the Kubernetes Gateway API support if you want, i did not have time to test it.
  #   enabled: true    # https://traefik.io/blog/getting-started-with-traefik-and-the-new-kubernetes-gateway-api/

image:
  name: traefik
  tag: 2.9.6

# Whether Role Based Access Control objects like roles and rolebindings should be created

rbac:
  enabled: true

logs:
  general:
    level: INFO

# Fix for acme.json file being changed to 660 from 600
# https://github.com/traefik/traefik-helm-chart/issues/164

podSecurityContext:
  fsGroup: null

additionalArguments:
  - --global.sendAnonymousUsage=false                                      # Disable anonymous usage
  - --entrypoints.metrics.address=:9100
  - --entrypoints.websecure.http.tls.certresolver=cloudflare
  - --certificatesresolvers.cloudflare.acme.dnschallenge.provider=cloudflare
  - --certificatesresolvers.cloudflare.acme.dnschallenge.disablePropagationCheck=true
  - --certificatesresolvers.cloudflare.acme.dnschallenge.delayBeforeCheck=60
  - --certificatesresolvers.cloudflare.acme.email=<your_email>
  - --certificatesresolvers.cloudflare.acme.dnschallenge.resolvers=1.1.1.1 # Cloudflare DNS
  - --certificatesresolvers.cloudflare.acme.storage=/data/acme.json

ports:
  web:
    redirectTo: websecure # Redirect HTTP to HTTPS
  metrics:
    expose: true
    # We want to have Traefik metrics and maybe tracing later on
    # The exposed port for this service, refference here : https://github.com/traefik/traefik-helm-chart/issues/626
    exposedPort: 9100
    # The port protocol (TCP/UDP)
    protocol: TCP

env:
  - name: CF_API_EMAIL
    valueFrom:
      secretKeyRef:
        key: email
        name: cloudflare-api-credentials
  - name: CF_API_KEY
    valueFrom:
      secretKeyRef:
        key: apiKey
        name: cloudflare-api-credentials

ingressRoute:
  dashboard:
    enabled: false

persistence:
  # storageClass: <your-storage-class>
  enabled: true
  path: /data
  size: 1Gi # 1Gi is the minimum as we only store some json files.

deployment:
  enabled: true
  # Number of pods of the deployment
  replicas: 1
  # Additional deployment annotations (e.g. for jaeger-operator sidecar injection)
  annotations: {}
  # Additional pod annotations (e.g. for mesh injection or prometheus scraping)
  podAnnotations: {}
  # Additional containers (e.g. for metric offloading sidecars)
  additionalContainers: []
  # Additional initContainers (e.g. for setting file permission as shown below)
  initContainers:
    # The "volume-permissions" init container is required if you run into permission issues.
    # Related issue: https://github.com/containous/traefik/issues/6972
    - name: volume-permissions
      image: busybox:1.35
      command: ["sh", "-c", "touch /data/acme.json && chmod -Rv 600 /data/* && chown 65532:65532 /data/acme.json"]
      volumeMounts:
        - name: data
          mountPath: /data

  # Custom pod DNS policy. Apply if `hostNetwork: true`
  # dnsPolicy: ClusterFirstWithHostNet

# Allways use resources definitions and limits, even for testing.
resources:
  requests:
    cpu: "100m"
    memory: "128Mi"
  limits:
    cpu: "500m"
    memory: "512Mi"
I taught of a way to make the comments more compact and i included some key points in the actual file.
Before deploying the helm chart, make sure you define the ’traefik-secrets.yaml’:
---
apiVersion: v1
kind: Secret
metadata:
  name: traefik-dashboard-auth
  namespace: traefik
data:
  users: YWRtaW46JGFwcjEkTk1hUGxWbmIkd1laUkhMbnVCNThrWXpheVdhZmtzLwoK

---
apiVersion: v1
kind: Secret
metadata:
  name: cloudflare-api-credentials
  namespace: traefik

type: Opaque
stringData:
  email: <your_cloudflare_email>
  apiKey: <your_cloudflare_api_key>
Here’s an example on how to generate Traefik credentials( obviously use a smarter user / pass combination ):
htpasswd -nb admin qwer1234 | base64
This will generate a key:
YWRtaW46JGFwcjEkTk1hUGxWbmIkd1laUkhMbnVCNThrWXpheVdhZmtzLwoK
Check to see if Traefik is UP before enabling the dashboard:
kubectl get pods -n traefik
Apply the services:
kubectl apply -f traefik-secrets.yaml
# This is the current version, but it might change in the future
kubectl apply -k "github.com/kubernetes-sigs/gateway-api/config/crd?ref=v0.4.0"
helm install traefik traefik/traefik --namespace=traefik --values=traefik-values.yaml
Add the dashboard IngressRoute and Middleware:
- I can’t stress this enough. Use a complex user / password combination. This is configured as a publicly exposed service.
---
apiVersion: traefik.containo.us/v1alpha1
kind: Middleware
metadata:
  name: traefik-dashboard-basicauth
  namespace: traefik
spec:
  basicAuth:
    secret: traefik-dashboard-auth

---
apiVersion: traefik.containo.us/v1alpha1
kind: IngressRoute
metadata:
  name: traefik-dashboard
  namespace: traefik
spec:
  entryPoints:
    - websecure
  routes:
    - match: Host(`<your_domain>`) && PathPrefix(`/dashboard`) or Host(`<your_sub_domain>`) # A matter of choice.
      kind: Rule
      middlewares:
        - name: traefik-dashboard-basicauth
          namespace: traefik
      services:
        - name: api@internal
          kind: TraefikService
Apply the dashboard:
kubectl apply -f traefik-dashboard.yaml
You should be able to login using your credentials.

Monitoring #
For monitoring, we will use Prometheus and Grafana as a helm distribution from the official helm repository.
helm repo add prometheus-community https://prometheus-community.github.io/helm-charts
# Or
helm repo update # if you already have the repo
I will be again using a values.yaml file to configure the helm chart that you might need to customise to your needs.
grafana:
  persistence:
    enabled: true
    storageSpec:
      volumeClaimTemplate:
        spec:
          # storageClassName: <your-storage-class>
          accessModes: ["ReadWriteOnce"]
          resources:
            requests:
              storage: 10Gi
  additionalDataSources: []
  admin:
    existingSecret: ""
    passwordKey: admin-password
    userKey: admin-user
  adminPassword: <your_password>
  adminUser: <your_user>

prometheus:
  service:
    nodePort: 30000   # To expose prometheus on the local node if you want, we will use this later to get the MinIO graphs in the MinIO dashboard.
    type: NodePort
  prometheusSpec:
    retention: 7d # set this to a conservative value, prom. uses a lot of disk space
    serviceMonitorSelectorNilUsesHelmValues: false # this allows ServiceMonitor definitions in all namespaces
    storageSpec:
      volumeClaimTemplate:
        spec:
          # storageClassName: <your-storage-class>
          accessModes: ["ReadWriteOnce"]
          resources:
            requests:
              storage: 50Gi
Install the helm and create the namespace:
helm install monitoring-stack prometheus-community/kube-prometheus-stack -f monitoring/values.yaml --namespace monitoring
Wait for the stack to be fully ready, you can check by running:
kubectl get pods -n monitoring
Expose the Grafana service:
---
apiVersion: traefik.containo.us/v1alpha1
kind: IngressRoute
metadata:
  namespace: monitoring
  name: grafana
spec:
  entryPoints:
  - websecure
  routes:
  - kind: Rule
    match: Host(`<your_domain>`) && PathPrefix(`/grafana`) or Host(`<your_sub_domain>`) # A matter of choice.
    services:
    - name: monitoring-stack-grafana
      port: 80
  tls:
    certResolver: cloudflare
kubectl apply -f grafana-ingress.yaml -n monitoring
You should be able to login using your credentials: